Skip to content

Cart

Your cart is empty

BENTLEY + LACE COUTURE MEASUREMENT GUIDE

A better fit starts with better measurements.

Accurate measurements help you compare a rental correctly and give us the information needed for made-to-order couture. This guide shows exactly where to measure, what not to do, and how rental measurements differ from custom measurements.

Bentley and Lace couture gowns
Measure the person — not the tag. Use true current body measurements. For rentals, compare those numbers to the finished gown. For custom orders, submit the measurements requested for the design.
USE A SOFT MEASURING TAPE MEASURE OVER CLOSE-FITTING CLOTHING KEEP THE TAPE LEVEL DO NOT ADD EXTRA INCHES MEASURE TWICE RENTALS + CUSTOMS USE MEASUREMENTS DIFFERENTLY
BEFORE YOU START

Four rules. Do these first.

01

Use a soft tape.

Use a flexible sewing tape measure rather than a ruler, construction tape or phone estimate.

02

Measure the body.

Measure over undergarments or close-fitting clothing. Bulky layers change the numbers.

03

Keep it natural.

Stand normally, do not suck in, and keep circumference measurements level and comfortably snug.

04

Measure twice.

If the two measurements are different, take a third. Use the number you can reproduce accurately.

WHY MEASUREMENTS MATTER

Couture fit is built from proportions.

A size label can only tell you so much. The relationship between circumference, torso and length measurements is what helps us understand how a gown will sit, where the waist will land and where the finished hem will fall.

01

Size labels are not enough.

A person can have the chest of one base size, the waist of another and a different torso or gown length. Measurements show us the actual proportions.

02

Length changes the entire silhouette.

Petal, knee, ankle and floor-length gowns depend on vertical measurements just as much as chest, waist or hip circumference.

03

Better information means a better decision.

Accurate measurements help you compare a rental correctly or give us the information needed to build a made-to-order gown around the wearer.

CUSTOM VS RENTAL MEASUREMENTS

Same tape measure. Different next step.

The measurements themselves should always be true body measurements. What changes is how you use them after measuring.

01 I'M MEASURING FOR A RENTAL

Compare the body to the finished gown.

A rental has already been made. Your measurements help you decide whether that specific gown's finished measurements, length and adjustable features can work for the wearer.

  • Take current body measurements. Do not begin with a normal clothing size.
  • Open the individual rental listing. Product listings include the gown's actual garment measurements and fit information.
  • Compare circumference and length. Chest/bust, waist and relevant gown length are especially important.
  • Read the adjustability notes. Elastic, ties and corset-style construction can affect usable fit.
  • Do not alter the body measurements. Compare the true numbers to the gown.
02 I'M MEASURING FOR MADE-TO-ORDER

Send us the true body measurements.

A custom gown can use the wearer's submitted measurements as part of the pattern and fit process, so accuracy matters more than fitting neatly into a standard size row.

  • Measure the wearer now. Use the current body rather than a clothing tag.
  • Submit the measurements requested. Different silhouettes may require different numbers.
  • Do not add your own ease. Do not add inches for comfort, growth or “just in case” unless our team asks you to.
  • Tell us the wear date. This is helpful when the gown is being ordered significantly in advance.
  • Mixed sizes are normal. The wearer does not need to match one row of a size chart.
VISUAL MEASUREMENT MAPS

See where the tape actually goes.

Use the correct visual reference for the wearer, then follow the exact written directions below.

Child Measurement Guide

Visual Reference
Bentley and Lace child measurement guide
Use this visual as a placement reference, then follow the written instructions below for each measurement.

Teen + Adult Measurement Guide

Visual Reference
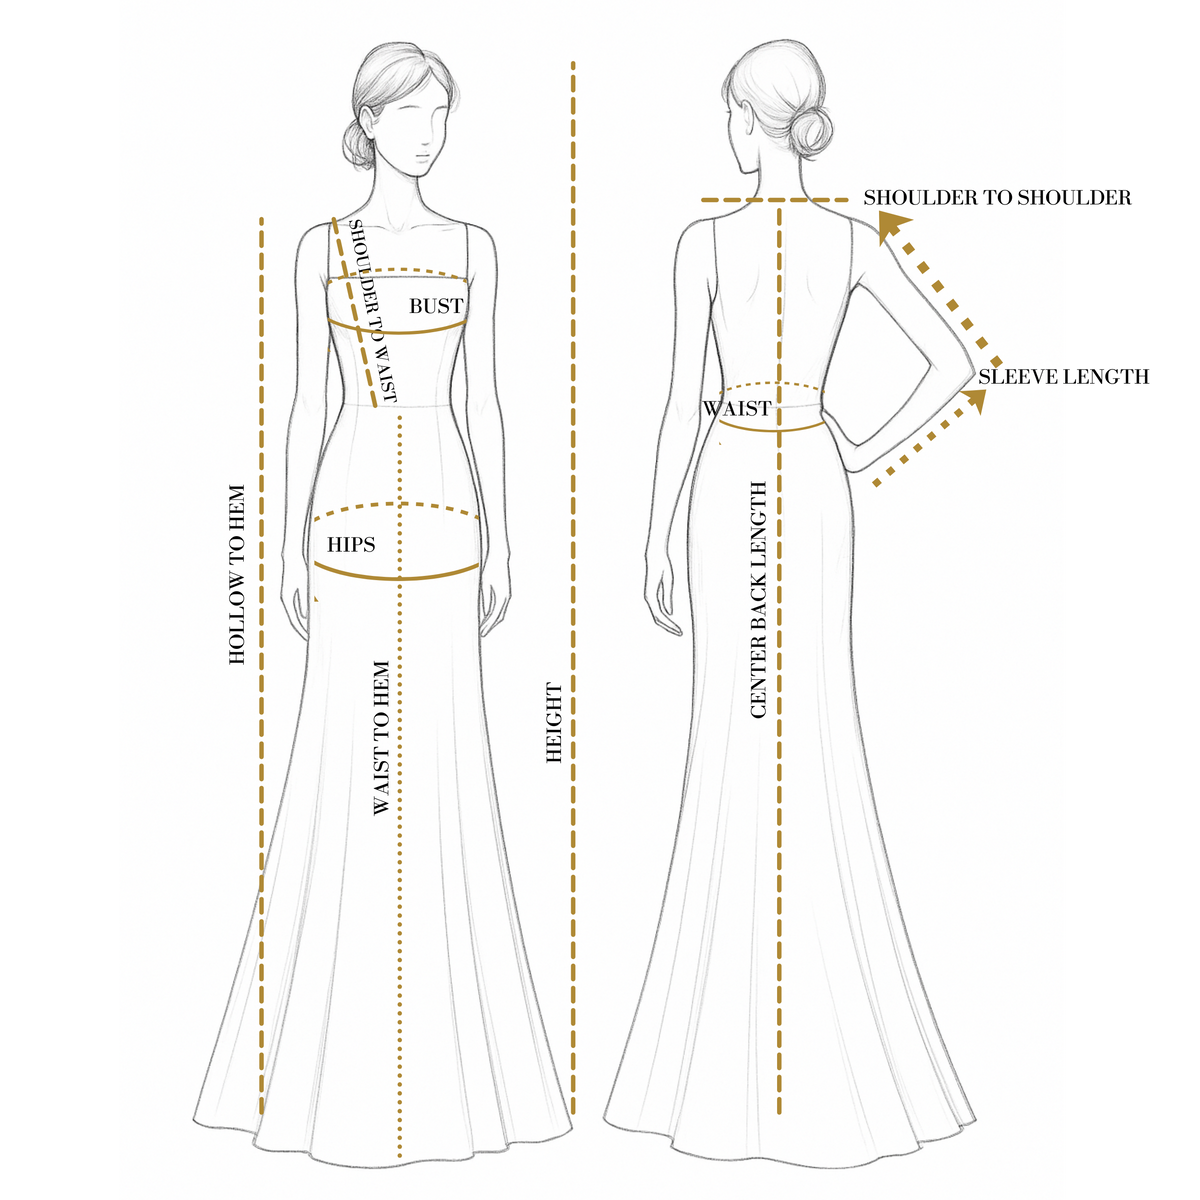
Bentley and Lace teen and adult measurement guide
Use this guide for teen and adult measurement placement, including torso, circumference and length reference points.
How to find the natural waist before taking couture gown length measurements
Natural Waist Visual Guide Tap to enlarge
ONE OF OUR FAVORITE MEASURING TRICKS

Find the natural waist before measuring lengths.

The natural waist is not necessarily where jeans, leggings or a skirt waistband sits. Marking it first gives you a consistent starting point for waist, torso and skirt-length measurements.

01

Have the wearer bend gently to one side. The crease that forms is usually the natural waist.

02

Tie a thin ribbon, soft elastic or narrow string comfortably around that point.

03

Leave it in place while measuring shoulder-to-waist, waist-to-floor and other vertical measurements that begin at the waist.

THE FULL MEASUREMENT GUIDE

Thirteen measurements. One clear method.

Take each measurement with the wearer standing naturally. Keep the tape flat, level where appropriate, and comfortably against the body.

Fit note: you may not need every measurement for every gown. Use the measurements requested for the made-to-order design or the measurements relevant to the rental silhouette you are considering.
01
Height
Measure from the top of the head to the floor while standing barefoot with heels together.The wearer should stand naturally — not stretch taller or tip the chin upward.
02
Chest / Bust
Measure around the fullest part of the chest or bust, keeping the tape level and comfortably close to the body.Look at the back of the tape too. It should not dip, angle or ride upward.
03
Natural Waist
Measure around the natural waistline, usually the narrowest part of the torso where the body naturally bends.Do not use the waistband of pants unless it happens to sit at the true natural waist.
04
Hips
Measure around the fullest part of the hips and seat, keeping the tape level and snug without pulling tight.Turn sideways and make sure the tape passes over the fullest part of the seat.
05
Shoulder to Waist
Measure from the top of the shoulder near the neckline down the front of the body to the natural waistline.Use the ribbon marking the natural waist so you end at the same point every time.
06
Shoulder to Knee
Measure from the top of the shoulder straight down to the center of the knee.Let the tape fall vertically rather than following the curve of the body.
07
Shoulder to Ankle
Measure from the top of the shoulder straight down to the ankle bone.Keep the wearer standing straight and measure to the same ankle point on repeat attempts.
08
Waist to Mid-Thigh
Measure from the natural waistline straight down to the middle of the thigh.Start at the marked natural waist — not a low-rise waistband.
09
Waist to Floor
Measure from the natural waistline straight down to the floor while standing tall and barefoot unless instructed otherwise.For floor length, keep the tape vertical and let it reach the floor without bending underneath the foot.
10
Inseam
Measure from the top of the inner thigh down the inside of the leg to the ankle bone.The tape should start high at the inseam point, not several inches below it.
11
Arm Length
Measure from the shoulder point down the outside of the relaxed arm to the wrist bone.Keep a slight natural bend in the arm rather than locking the elbow straight.
12
Shoulder Width
Measure across the back from one shoulder point to the other shoulder point.Measure shoulder point to shoulder point — not from the outside edge of the upper arms.
13
Neck
Measure around the base of the neck where a necklace or neckline would naturally sit.Keep the tape comfortable and flat. Do not pull it tightly against the neck.
WHICH MEASUREMENTS MATTER MOST?

Different gowns care about different numbers.

You do not need to treat every measurement as equally important for every silhouette. These are helpful starting points — then always follow the individual gown listing or the measurements requested for your custom design.

MOST RENTALS

Chest / Bust + Waist + Length

These are often the first numbers to compare when evaluating whether an existing rental can work.

FITTED SILHOUETTES

Bust + Waist + Hips

When the gown is fitted through the seat or lower body, hip measurement becomes especially important.

FLOOR LENGTH

Torso + Finished Length

Shoulder-to-waist plus waist-to-floor or hollow-to-hem helps determine where the waist and hem will actually land.

SLEEVES

Shoulder Width + Arm Length

These measurements help us understand sleeve placement and finished sleeve length for designs that require them.

MATERNITY

Bust + Ribcage + Hips + Length

Maternity proportions use different fit points, so current measurements are especially important.

Always use the individual gown first. Rental silhouettes and custom designs can require different measurements. If a product listing or our team asks for a specific measurement, that instruction takes priority.
THE GOLDEN RULE OF MEASURING

Measure the body that exists today.

Don’t size up. Don’t add room. Don’t change the number because it looks smaller or larger than you expected.

Give us the real measurements. We’ll handle the couture.

BEFORE YOU SUBMIT OR RESERVE

Your measuring checklist.

Use this as your final check before reserving a rental or submitting made-to-order measurements.

Checklist progress 0 / 16
COMMON MEASURING MISTAKES

Four things that can throw off the fit.

MISTAKE 01

Using a clothing tag.

“She wears a size 6” is not a body measurement and is not enough information for couture fit.

MISTAKE 02

Pulling the tape too tight.

Compressing the body makes the measurement smaller than the wearer actually is.

MISTAKE 03

Letting the tape droop.

Chest, waist and hip measurements should stay level all the way around the body.

MISTAKE 04

Adding room yourself.

Do not turn a 24-inch waist into 26 inches because you want comfort or growth room.

MISTAKE 05

Using the wrong waistline.

A jeans or legging waistband may sit lower than the true natural waist and can throw off every vertical measurement.

MISTAKE 06

Ignoring length.

A gown can fit through the chest and waist but still be wrong if the torso or finished length lands incorrectly.

TIPS FROM OUR FIT TEAM

Small measuring tricks. Better information.

These simple habits eliminate many of the most common fit mistakes before they ever reach the order form or rental cart.

01

Measure twice.

If the numbers differ, take the measurement a third time rather than choosing the number you expected.

02

Write the exact number.

If the waist is 24¼ inches, record 24¼. Do not automatically round up to 25.

03

Mark the waist first.

A ribbon around the natural waist gives you one consistent starting point for torso and skirt-length measurements.

04

Check the back of the tape.

Ask a helper to make sure chest, waist and hip measurements are level rather than dipping behind the wearer.

05

Don't add growth room.

Give us the measurement that exists today. If timing or expected growth matters for a custom order, tell us the wear date instead.

06

Take a photo if you're unsure.

If a measurement seems unusual, a quick photo showing where the tape is positioned can help our team understand what you measured.

WHEN SHOULD I REMEASURE?

Old measurements can become old information.

The child has had a recent growth spurt.
Your measurements are several months old.
You are ordering for an event well into the future.
Pregnancy measurements have changed.
A previous gown fit differently than expected.
You are moving from a short gown to a floor-length silhouette.
MEASUREMENT QUESTIONS

Before you write down the numbers.

If a number looks surprising, measure it again rather than changing it to the number you expected.

Should I add extra inches for comfort or growth?

No. Use the true current body measurement unless Bentley + Lace specifically asks for something different. Garment ease, adjustable features and construction are handled separately.

Should I measure over clothes?

Measure over undergarments or very close-fitting clothing. Avoid sweaters, jackets, thick denim, full skirts or other bulky layers that can change the measurement.

What if I measure twice and get two different numbers?

Take the measurement a third time. Check that the tape is level, that you are using the same starting point and that you are not pulling tighter on one attempt.

Are rental measurements different from custom measurements?

The body measurements should be taken the same way. The difference is what happens next: rentals are compared with the finished gown and its fit notes, while made-to-order gowns can use submitted measurements as part of the pattern and fit process.

Do I need every measurement for every gown?

Not necessarily. Different silhouettes require different information. Follow the measurements requested for the made-to-order design or compare the measurements relevant to the rental gown you are considering.

Should I use the wearer's normal clothing size instead?

No. Clothing sizes vary by brand and do not replace actual body measurements. Measure the wearer and then use those numbers with the appropriate Bentley + Lace size or rental fit information.

What should I do if I am unsure where the natural waist is?

Have the wearer bend gently to one side. The natural crease that forms is typically the natural waistline and is usually narrower and higher than a low-rise pant waistband.

Can Bentley + Lace help me check my measurements?

If you are unsure, send us the measurements, whether you are shopping a rental or custom, and the gown or date you are considering so we can help you review the next fit step.

MEASURED? NEXT STEP.

Now use the numbers.

Use our Couture Size + Fit Guide to understand the charts, or send us the measurements if you want help comparing a rental or planning a made-to-order gown.